Introduction
How to Search Within Skywise Support Portals
This article shows you how the search feature works within the Skywise product support portals.
We estimate that this will take 6 minutes to complete.
Portal Searching
Portal Searching
All of the product support portals have search functionality within them and this works in the same way for every portal. In this article we will use the Charts+ product support portal for demonstration purposes.
HINT
Although searching is very simple, there are some methods you can use that we will explain in this article that help you to get to the results you are looking for quickly and easily.
All searches need to start from the product support page at www.skywise.com/support
![]() Click the Flysmart+ / Charts+ button.
Click the Flysmart+ / Charts+ button.
Let's imagine that we are looking for help on the Charts+ product and that we need help on route planning.Our keyword that we will use when searching is "route".

![]() Click the Charts+ hyperlink.
Click the Charts+ hyperlink.
We need to open the Charts+ support portal.

![]() Click the Search input field. Enter route into the Enter your search term here... field.
Click the Search input field. Enter route into the Enter your search term here... field.
We have navigated to the Charts+ support portal. Note, we are not logged in as an authorized user yet. This means that the content we can see and the content we are search on will be restricted to only that content which is classified as being for public use.
You can tell that you are not logged in, because the Login button is available.
HINT
Do you notice that there is an icon resembling an open book next to each of the search results? This indicates that the result is classified as a solution from the knowledge base.
The search results are restricted to publicly available content. Clicking on any of the search results will take you to the relevant content.
![]() Click the Route Validation (Charts+Windows 18.1) list item.
Click the Route Validation (Charts+Windows 18.1) list item.
- Log into Support Portal

![]() Click the Login hyperlink.
Click the Login hyperlink.
![]() Click the LOGIN button.
Click the LOGIN button.
You would normally fill in your username and password next, but for the purposes of this demonstration we have filled them in already.
HINT
If you do not have a username and password, but would like one, or you have colleagues that need one, then please complete the form at the bottom of the page at www.skywise.com/support.

![]() Click the Search input field.
Click the Search input field.
![]() Press the
Press the ![]() key.
key.
HINT
You don't have to press enter whilst searching. Results are listed before then, and you can click on a search result to see the article. Also, notice that search results include searching tickets which have been previously submitted.
All results in all categories are now listed. You know that it is all the results because the All tab is highlighted. Results in the All category often go over more than one page.
HINT
Do you notice that the word we searched on is highlighted in the results? Searches are not case sensitive.
Because there are so many search results, it can be useful to filter them by category. Let's turn on the filter by "Solutions". This means the results are filtered to only show knowledge base articles.
![]() Click the Solutions hyperlink.
Click the Solutions hyperlink.
Filtering by "Topics" shows only the forum topics that match our search.
![]() Click the Topics hyperlink.
Click the Topics hyperlink.

![]() Click the Tickets hyperlink.
Click the Tickets hyperlink.
Let's now filter by "Tickets" only.
![]() Click the Charts+ hyperlink.
Click the Charts+ hyperlink.
You can only view tickets for which you have the proper access rights to.
Return to the Charts+ support page using the breadcrumb trail.
- Add a New Support Ticket
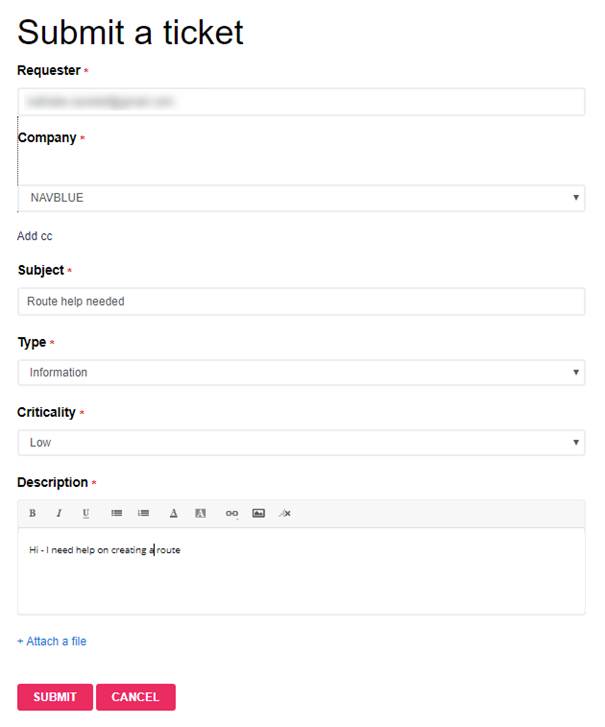
Add a New Support Ticket
At this point, we will raise a new support ticket with the word "route" included in the ticket.
ATTENTION
When new tickets are added, the text within the ticket does not immediately become searchable. This can take two to three minutes on average.

![]() Click the SUBMIT A TICKET button.
Click the SUBMIT A TICKET button.
![]() Click the Subject input field. and Enter Route help needed in Subject input field.
Click the Subject input field. and Enter Route help needed in Subject input field.
![]() Click the Type dropdown button.
Click the Type dropdown button.
![]() Click the Information list item.
Click the Information list item.
![]() Click Description.
Click Description.
![]() Click the Submit button.
Click the Submit button.
All of the tickets you have created can be found in "MY TICKETS".
![]() Click the MY TICKETS hyperlink.
Click the MY TICKETS hyperlink.
![]() Click the Route help needed #65870 hyperlink.
Click the Route help needed #65870 hyperlink.
The ticket is now shown and can be used as normal.